Fleeces – more than merely merino
…when you work with fleece right off the sheep, full of grease and bits and bobs, trust me you get dirty and well the smell of all that stuff warmed up with hot water.. well.. I think you know what I am getting at!
…when you work with fleece right off the sheep, full of grease and bits and bobs, trust me you get dirty and well the smell of all that stuff warmed up with hot water.. well.. I think you know what I am getting at!

It has been a while since I have “played” in the studio… sometimes life gets too busy. Today, after a good talk with a friend far away, I feel that my head is starting to clear and the time to play is approaching… that … and spring is in the air!

When I work with text or drawings (either hand-drawn or computer generated), I need to go through a variety of steps to move them from the 2 dimensional world on my computer or piece of paper, to a 3 dimensional format that I can use to create the mold the the jewelry I create. One of these techniques is using photopolymers.
Felters who make handmade felt all have felt lying around that was either a sample test, a project that just was not right or simply bits left over from larger projects. There is nothing like handmade wool felt, and event the smallest pieces never get thrown away, after all.. each piece was lovingly made by hand! For those of you who are not felters, follow these directions using just about any fabric.
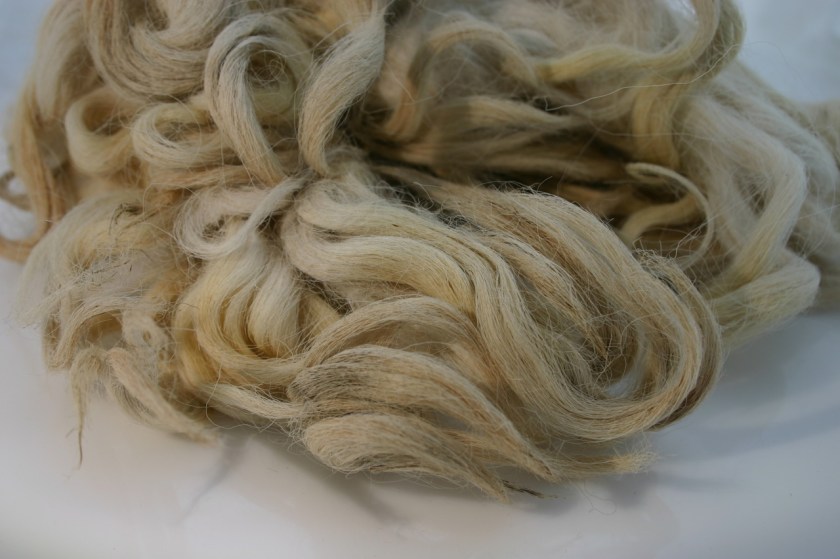
Since that trip, I have been obsessed with trying to new wools. Specifically Norwegian heritage sheep, but also other breeds to get a better understanding of wool and how it felts.
A few moments from the studio today. Made using a mix of Norwegian C1 and pelsull with a touch of silk throwers waste for accent. Here is a glimpse of the process: UPDATE: This photo will give you an idea as to how much it shrunk in the felting process. Norwegian C1 is fantastic wool! ohhh.. and a link from Siki in Canada.. I absolutely love this, turn your music on and enjoy.
Quite honestly, the possibilities are endless. Simple cards that a child could do, or more creative projects, like the purses I made. I have gocco-ed fabric, paper napkins, books, leather, felt and more… let me know what you have gocco-ed. Ohh.. an by the way, for the purses, I used 4 different screens, each one with a design I sketched by hand.
and then the important part.. see that hammock in the garden, grab a good “how to book” lay back with a cup of coffee and learn something new while relaxing to the rhythmic sounds of your tumbler.
Another ring in the works… This is a photo of my next piece in the kiln. The ring is sitting on a bed of vermiculite and some fibre blanket for support. I make plugs out of investment (powder that is mixed with water and then set – here is the brand I use) in the correct size such that the ring will be a specific size once I am done. This one is made size 8 1/2 (American sizing – to convert click here) I own a Paragon Xpress E-14A it is such a fantastic piece of equipment. I did a ton of research before choosing my kiln and this one will allow me to move on in other forms and media including glass fusing/slumping, ceramics (I do silkscreening and have a serious set of custom dishware patterns in my head), enameling as well as lampwork beads (I chose the option of a beaddoor) because I know myself… It is just a matter of time! I am reasonably well versed in all of these techniques, …
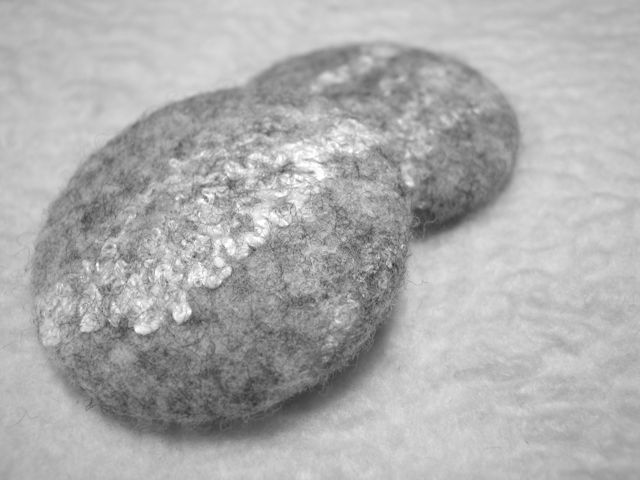
For those of you who have been following this blog, you know that I am working on a line of felt & silver jewelry. This is the prototype for a series of earrings.
As you roll the ball, you will feel it start to felt. Resist the urge to squeeze it, as the secret to getting a perfect pearl is going slow and gentle.
Some artists prefer to see their work take on a life of its own, only knowing at the end what the final product will be. I have a hard time working that way.
I am working on a line of silver and felt jewelry. I am sculpting fine silver “egg shells” which will be turned into earrings set with a “felt pearl”.
One thing I love is to come across a great tutorial that gives you a glimpse of the day to day workings of an artist. To see a work in progress is something that I cherish. Watching it come to life step by step.
