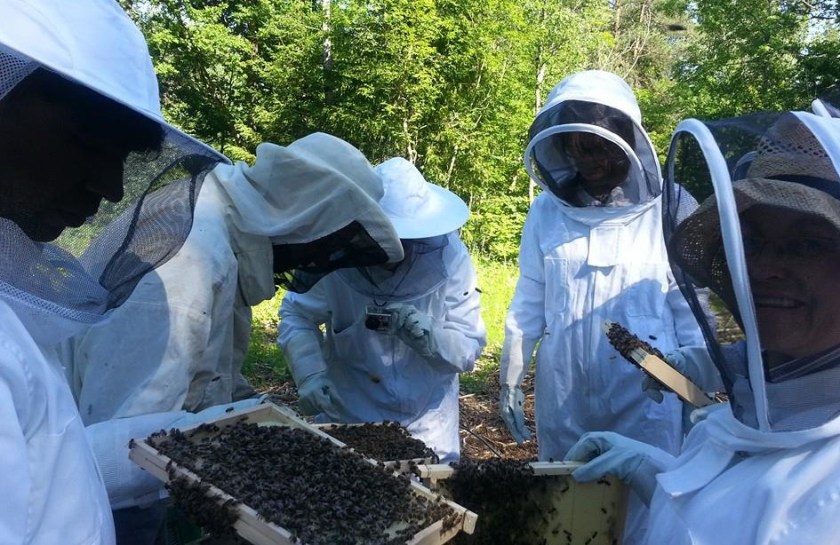
Author: CynthiaReynolds

dehydrated vegetables and herbal salt

An interesting day at Hellviktangen’s farmers market this weekend. A lot less people came, likely due to the rain, but the ones who were there were very keen on hearing details about the products that I had available. One  item that brought about great interest was my seasoned salt. Such a simple ingredient to have on hand and it can be used on so many ways. Throughout the growing season, while everything is fresh and abundant, I do my best to preserve what I can. One of the methods I use is dehydration. My pantry is full of mason jars with a huge variety of dried goodness in them. My trusty mandoline which has been well used for over a decade makes quick work of the task, and once thinly sliced, I place everything in the dehydrator and let it go to work over night. I dehydrate at no more than 40C (104F) in order to maintain the optimum nutritional value. While I do not adhere to the Raw Diet, I choose to use this process for dehydration …

Calendula salves and ‘tub tea’

Calendula.. ahh.. such an amazing plant! This week for the farmers market at Hellviktangen, I am putting together more of my salves and ‘tub teas’. Throughout the summer I collected calendula from Ekebo, our collective farm. The more you pick, the more buds appear, it is amazing what mother nature can do. Once home, I laid them out on trays to set in the dehydrator. I prefer to keep the temperature down and wait longer than to rush the process and risk overheating the flowers. Once they are bone dry, I remove the petal from their stems and store them in a clean airtight jar to be used in a myriad of ways. In order to make an infused oil from them, fill a clean jar halfway with petals and then top up with the carrier oil of your choice. Many use olive or coconut oil, but I prefer almond oil for skin products. Vitamin E can also be added to help prevent your oil from going rancid. Let the oil sit in a warm spot …

Granbakken at the Local Farmers Market

This weekend Hellviktangen Kulturhus is hosting a mini farmers market. It was a very last minute invite for those who grow and/or create things with local produce, and while looking in my pantry after a season of ‘making’ I thought why not! Every year throughout the late summer and autumn, I put together a good sized batch of homemade goodness, most of which is given out to friends, family and neighbours. This year, I have more than enough! Why ‘Granbakken’? Granbakken (which translates to Spruce Hill) is the name our our property. Our home is an old timber summer house from 1921, and whenever I label something from my kitchen, it has had the Granbakken name on it. I find it very appealing to keep the history of our home alive. So I have been in the studio designing, printing and plotting labels for jams, jellies, salves, tub tea and more! I love being able to combine studio life with kitchen creations 🙂 My children have also been asking when we will be using the fruit press and crusher, and as our usual fall …

Black garlic

Patience is not a virtue I possess. Ask anyone who knows me and they will attest that my curiosity almost always gets the better of me. So when my latest culinary experiment’s success hinged on my letting time do it’s thing, I was not sure I could pull it off. Garlic is something that we use in abundance in our kitchen, and I am always interested in trying new cultivars and means of preparation. It was in researching fermented garlic (next on my to do list) that I stumbled across black garlic, and I knew I had to find a way to make it myself. Black garlic (falsely referred to as fermented – as it does not involve any microbial action) is garlic that has been heated over the duration of many weeks at a constant temperature and humidity. The sugars in the garlic are slowly caramelised and develop a deep umami flavour that is quite simply fantastic! The texture of the cloves soften and the flavour mellows to something reminiscent of balsamic vinegar and truffles. Last night while …

Bees are buzzing!

Always keen on trying out new pursuits in life, it was just a matter of time until apiculture was on the agenda. Many who know me are surprised, given my distaste (for lack of a better word) of bugs, but these little girls (and their drones) are just lovely! With hopes of harvesting honey, all the while helping the environment, the adventure begins! So along with my cohorts at Ekebo we have set up our hives and are learning all about what we can do for the bees, as well as what they can do for us. Enlightening is the word I would use to describe apiculture. There is simply so much to learn about how bees do what they do. A little overwhelming at first when you are reading about it, but once you have your own bee colony to follow and learn with, you simply go day by day. The bee gang at Ekebo consists of new beginners, a few who have taken beekeeping courses, and some who have some solid experience to help us all out. I can …

it is the process not the product

One thing always holds true, I love to learn. My husband is forever in awe as to how I am never bored. Curiosity, it is a gift, one that I hope to never take for granted. For the last while, my curiosity has had me spending a little less time in the studio, and more time in the kitchen and beyond. Creativity can be expressed in many facets in life, and these last years have been a delicious adventure. I have long thought of starting a new blog, as this one has focused mainly on my studio work, but the truth is that being a ‘maker’ does not have to be confined to my art. Many who know me have heard me say time and time again, that it is the process and not the product that is important for me. Diving in head first and learning everything I can about a subject is something that I love, and in the end, it is the knowledge and experience that I cherish more than the final product… and boy have I …

New tool in the studio

Over the holidays, the studio welcomed its newest tool, a plotter (cutter). There are many on the market, each having their own pros and cons, but after having done some research, I found the one for me. I have always had a love for words.. quotes and sayings… and being a font addict with a reasonable handle on graphic design and a love for Adobe Illustrator, the possibilities with this machine are endless! It cuts so much more than vinyl… cardstock, fabric, stencils for glass etching and fabric stenciling, heat transfer for clothing.. and I have even sourced reflective heat transfer for clothing. That may sound crazy to most of the world, but living in Norway, the dark season makes wearing reflects mandatory. My son has decided he wants to start a business selling his own reflects designs.. and he is only 8! Time to make space in the studio. Yesterday I made my first wall piece from vinyl. Well beyond the standard size of the plotter (the wording is just over a meter high), …

leather handles on felt bags

A while back, I blogged about the raw wool felted laptop bag (see post) that I created for myself, and I thought I would show how the handles were made. Store bought handles of all shapes, sizes and colours are available in most craft stores (or online), but in my opinion, nothing beats a good quality, handmade, adjustable thick leather strap with solid brass fittings. I have not used a pattern for doing this.. I simply gauge the size based on the bag and what feels comfortable. The only factor to consider is the width of your buckle. I cut five pieces of leather, one for the strap, and two shorter pieces that are doubled over and secured to the felt itself using chicago screws (leather bond optional), and two narrower pieces that are looped to keep the strap from flailing about. The side pieces are very simple.. an oval hole in the middle for the buckle to pivot, and in this case two holes matched up on each side.  Punch matched holes in your …

The life of a Maker… studio time

I managed to get in some studio time of late to finish off some orders, and get a few pieces photographed. Years ago I read that an artist should take photos of everything they make regardless of whether it is going to be a personal gift or go up for sale (or already sold for that matter). Time to start getting into the habit. Jewelry photography is a tedious task, requiring very bright lights with a light tent to control reflections and shadows. I keep thinking I need to set up a photo spot in the studio, such that it is not such an effort setting everything up each time. My children spend quite a bit of time with me in the studio.. asking questions, playing on the floor.. digging through all the tools and supplies while dreaming of what they want to make next (they now even have their own cupboard of supplies). It has been a productive time, and with studio visits scheduled later this week with neighborhood children, there will be lots …

A handmade holiday

With the holidays fast approaching, it is time for my annual ‘buy handmade’ appeal. 🙂 (click here and take a moment to read my post from 2009) Every year, by the time mid-November rolls around our mailboxes fill to the brim with holiday catalogs from near and far. The vast majority of the stuff (for lack of a better word) is made in some far off place where people are underpaid and their work is under appreciated. This year, as every year, I will spend my time making.  I had originally signed up for Epla’s 1st ‘in the flesh’ christmas market, which will surely be a grand success; but due to priorities and a heavy schedule… going into production mode was simply out of the question, so I have had to free up my spot — given the waiting list to get in, I am sure it made someone very happy! Speaking of Epla, they turned 2 this week, and their success is admirable! I started with them when they first opened their doors, and have …

FeltUnited 2011 exhibit is online :)

Another year of FeltUnited comes to a close, bringing together a three year theme covering the colour wheel. What started as a simple idea three years ago as a way of bringing artists together in a joint exhibit, has come together into an event with a following that we could not have dreamed of; over 66000 hits on the website, and well over 1250 artists in close to 40 countries. Given those numbers, one of the big topics covered while Elis Vermeulen and I met in London earlier this week was the future of FeltUnited. Things need to change.. for the betterment of all 🙂 Stay tuned for more information after the new year. Until then, we will be taking time to enjoy our families and rest up before the holidays are upon us. In the meantime, make yourself a warm cup of something good and peruse the exhibits 🙂

felted laptop bag – using raw fleece

Forever inspired by my dear friend Elis Vermeulen of Holland to work with raw fleece (see my previous post on working with Texel with Elis), I decided to make myself a laptop bag a while back using my favorite medium. I have yet to add the straps (really need some studio time this week), but will be using some good quality leather with a buckle to make it adjustable. The base is made using norwegian C1  (I planned for a shrinkage of 30%). It is the perfect wool for sturdy bags. It produces a nice firm felt that hardly pills and wears well.  Now to pull out a hide of leather and some brass findings. Oh! by the way, if you are interested in learning more about how to work with raw fleece, Elis will be teaching a bag class at the Creative Felt Gathering in Michigan this september. See her website for more details, or contact her to arrange a workshop in your area.

FiberArts Spring 2011 issue review of FeltUnited

FeltUnited in FiberArts magazine

FeltUnited in the spring 2011 issue of FiberArts magazine. (available internationally in newstands now) What started out almost two and a half years ago as a simple thought on bringing together felt artists from around the globe, has grown to be so much more than Elis and I could have imagined. The FeltUnited website tipped the 50,000 hits mark recently and our facebook group is nearing 1000 fans. Who would have imagined?

Kiln fired enamel

Enamel – a fantastic way to bring some colour into what can often become a world of black and white when working with silver. This week, I have been testing a set of colours from Thompson Enamels – transparent/lead free for use on silver/copper/gold. Enamel is powdered glass which, when heated melts, flows and hardens to a smooth, durable vitreous coating on metal. Enameling can also be done on glass or porcelain, but requires enamels with a different COE (Coefficient Of Expansion) – expansion rates must be suited to the base surface material. Prior to using enamels, they need to be washed to remove the “fines” – (extra fine particles which can cause your enamel to be cloudy). This can either be done: wet: by rinsing in water multiple times until the water runs clear or dry: by using a series of sifting pans to separate the particle sizes (60, 80, 100 mesh etc.) Regardless of which technique you plan on using to apply the enamel, the silver must be properly prepared, polished and cleaned to …